Guess What!! I'll be on The Stamping Boutique's Design Team for the next 3 months ... Can I get a "WOOT, WOOT!" I'm so excited. Tracey is a very talented artist and I can't wait to see what she comes up with next for us to play with.
Tuesday, August 31, 2010
Paper Playtime challenge
Guess What!! I'll be on The Stamping Boutique's Design Team for the next 3 months ... Can I get a "WOOT, WOOT!" I'm so excited. Tracey is a very talented artist and I can't wait to see what she comes up with next for us to play with.
Monday, August 30, 2010
More Stamping Boutique images
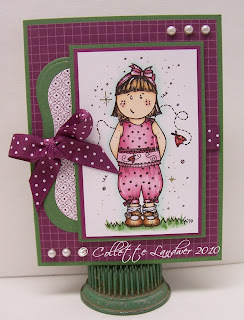 This first card was made with The Stamping Boutique's Audrey with Lady Bug. She was colored with Copics. I used Stampin' Up's Razzleberry designer paper and Razzleberry/Garden Green mats. Finished off with some of their beautiful razzleberry grosgrain ribbon. Isn't she a cutie?
 This next card was made with The Stamping Boutique's Dawn from Tracey's Enchantment Line. The image was colored with Copics then cut out to pop her up on dimensionals. The designer papers are from Basic Grey's Lemonade paper pack. I stamped the sentiment from Stampin' Up in Old Olive then punched out w/the label punch & offset it on an olive mat before popping it up on dimensionals. Finished off with some olive ribbon and some pink half-pearls. I love, love, love Tracey's Enchantment Line ... waiting for some more, lol.
Tuesday, August 24, 2010
Splitcoast challenges for Color and Technique
 This next card was made from yesterday's Technique Lovers Challenge - to use Beate Johns' Faux Stained glass technique. Beate used something like Glossy Accents or Crystal Effects and Layered some glitter for hers. I'm a self-proclaimed glitter-phobe, so I have none in the house. Instead, I used some Platinum Stickles. I stamped the cross image on an sheet of acetate with Stazon black. I flipped the image over to apply the Stickles to the reverse side. Once dry (later that day ....), I flipped it back over so the layer of stickles was on the underneath side. I popped the acetate & mat up on dimensionals so it could show the shadows. I love the way the Cross loops seem to go with the loopy flowers in this SU designer paper. I'm loving this Marina Mist color, too ... So pretty . The sentiment is from Our Daily Bread's line. I wanted focus to stay on the cross, so I used a light blue stickles for the 'pearl' effect around the frame to give it just a smidge of texture, as well as below the scalloped edge at the bottom.
Monday, August 23, 2010
Monday Stamping ...
This 3rd card was made with an image sent to me by the wonderful Patricia Rose. I colored him in with Copics and used Basic Grey's Olivia designer papers as well as a tab from BG's Olivia line for the image.
Not sure what happened, if I over edited the photo, because the colors look weird on right mouse, but look same IRL ... may take another photo and see how it looks.
Thursday, August 19, 2010
Midnight Madness and Color Me Creative Challenge
This card was made following the
Images: C.C. Designs, Cherry Emma and Bench
Thanks for stopping by !
Wednesday, August 18, 2010
Splitcoast Challenges
This first card was made using yesterday's color combo: Cherry Cobbler, Pretty in Pink and Always Artichoke. First off, I dyed my white organdy ribbon artichoke. I laid the ribbon on the ink pad, held it in place w/a piece of sponge then pulled the ribbon through, setting it aside to dry. The image is a digital one from Digital Two for Tuesday. I colored her with Copics then highlighted a bit here 'n there. She was matted on cherry then pink then popped up on dimensionals. I punched slots for the ribbon to slide through. The background paper is SU dp matted on artichoke then the card base of cherry.
Added a few dew drops in pink to finish it off.
Digi Day treats
 This next card was made for the challenge to create a Birthday inspired card - although I suppose it would also fit into the above category - balloons, two designer papers and ribbon - even if it is crocheted trim. I colored this beauty with Copics as well and added some Glossy accents to the balloon and her ice cream. I'm not an orange kind of gal, but I like these colors.
Thursday, August 12, 2010
More Stamping Boutique digital's

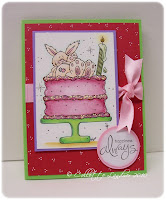
This second one is a new one from The Stamping Boutique. After coloring it with Copics, I added some stickles to the frosting for a nice sparkle/dimension. The background paper was created with Stampin Up's real red and dotting tri-polka dots all over with a white gel pen.
This last one is from Tracey's Enchantment Line - Curiosity - another digital image. I colored her with Copics (as well as the white organdy ribbon). Added some clear glitter gel accents and some glossy accents to the birds eggs. Finished off with some pink/rose Dew Drops.
Friday, August 06, 2010
Fun with Copics

This first card is a digital image from The Stamping Boutique - released for a blog hop for Bella ... see previous posts for details, the blog hop is actually over now. I love the vintage nature of the image. The image was colored with Copics and then I added some glossy accents to the corners and the hanging lollipop. Mats are SU's dusty durango and chocolate chip. I added some trim below the image using a Martha Stewart scalloped eyelet punch on both layers.

This next card was made using a digital image from Tiffany Doodles. I wanted a big ice cream, so enlarged it to take up most of the space. I colored the image with Copics then added some Shimmerz to the pink. Tried to get it to show in the photo, but this is as good as it gets, as the sun is going down.
I also followed the color challenge for the Copic Musketeers (see blinkie on the left side) - to use pink, black, bright blue and bright green - Check! I took a piece of SU dp and ran it through the Argyle cuttlebug embossing folder then sponged around to bring out the dimension.
Finished off by adding some black stickles to the image's corners.

This last one was made using one of The Stamping Boutique's Back To School images - the apple, which was colored with Copics. This is also a challenge - sketch this time - for the Copic Musketeers. I matted the white on real red cardstock then ran both through the Sizzix Dots & Circles folder before sponging with some real red. The double arc is red Stickles. I finished off with an organdy polka dot blue ribbon.
Challenge for Color Me Creative students
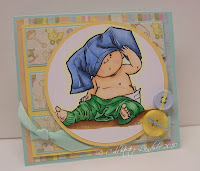
I used some designer paper from Paper Studio's Sweet Pea paper pack and matted with some Stampin' Up Saffron and Paper Trey Aqua Mist then added som aqua mist twill ribbon & buttons with floss. Such a sweet pea, isnt' he?
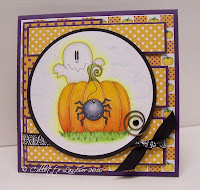
For this card, I used MyGraphico - Image and digital dp's. I colored with Copics then highlighted with clear spica around the clouds, ghost's eyes and seams on the pumpkin. Added some Glossy Accents to the ghost nose and spider's eyes.
Finished off with a spiral clip, some 2-sided black ribbon and popped layers up on dimensionals.
I don't typically send out Halloween/Fall cards, but I'm looking forward to sending this one out.
Thanks for stopping by!
Wednesday, August 04, 2010
Blog Candy Winner ......
Melina - please email me at bunefoo@yahoo.com with your email address.
Thanks!


