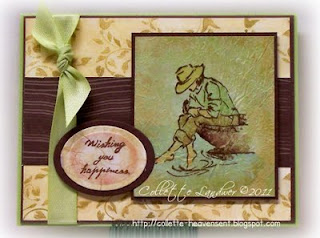
 Today over at SplitcoastStampers, the Technique challenge is to create a project using the Faux Silk technique with a twist.
Don't know about Faux Silk? Here's an abbreviated description:
1. Stamp an image on tissue paper
2. Crumple up the tissue paper into a ball (once the ink has dried)
3. Carefully un-crumple - be extra careful NOT to smooth it out.
4. Take a piece of cardstock - works better on lighter shades (my favorite is the Natural white or confetti) and apply glue (I've tried the tombow liquid, a glue stick and several others, all with the same results). It just has to be completely covered, unlike what you would get with a tape runner, in streaks. Make sure you glue up an area that's at least as big as the stamped image with a bit of a border around it so when you trim it down, you'll not have loose tissue on the perimeter.
5. TAP - this is the key - DON'T smooth out ... tap down on the image so that some wrinkles form in the paper. Make sure you 'walk' your fingers around the entire piece to adhere it all down to the cardstock.
6. Set aside to dry
7. Trim as you would any other image
8. Fun finishers - I like to lightly sponge over once it's dry with something like Tim Holtz' Antique Linen - it makes the wrinkles pop and look more like silk fabric.

Anyway ... on to my (3) ... yes, three ... samples. I've not used this Stampin Up Summer by the Sea set in so long, it actually wept in appreciation as I pulled it off the shelf.
I stamped all 3 images with Memento brown ink and let dry before crumpling the papers. After adhering them as described above, and letting them dry, I sponged lightly over all of them with the Antique Linen and then trimmed them down. Once they were trimmed down, I used various shades of stamp pads and a watercolor brush to lightly watercolor them.
Hope you enjoy them all ... Look forward to hearing what you have to say about them.
Thanks for stopping by ...


1 comment:
More brilliant cards!!!! Loving how you did this technique!
Post a Comment