
Been busy around the house lately, just started back up again with art journaling and making handy chipboard storage pieces for my artsy area.
This is my first attempt at making anything out of chipboard. Based on it's size, it means that I can't buy any more distress ink pads or reinkers. So sad ...

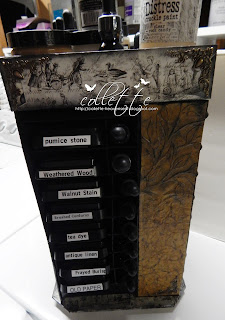 After painting the entire thing black, I decorated the sides using a faux leather technique and kraft cardstock for the uprights, ad some pretty toile print for the top box. There are some metal corner pieces that I put here and there. I finished this baby off by attaching a 5 inch carousel/lazy susan/spinner, or whatever you call them, so that it can spin and I can find the color of distress ink that I need.
Check out You Tube by typing in chipboard projects for the construction, and faux leather for the sides.
Hope you enjoyed this one ... now for the next one ... it's actually a Stickles carousel. I tried making the above for a Stickles carousel, but the shelves ended up being not high enough, so I modified it to the distress holder. This one, I measured twice and then cut once, lol.


This is my first attempt at making anything out of chipboard. Based on it's size, it means that I can't buy any more distress ink pads or reinkers. So sad ...

This baby was built in sections from videos I found on You Tube (type in chipboard projects and they'll come up). I made each of the 4 sections separately from a medium weight chipboard, then boxed them together so there would be one on each side. I'm glad I modified the measurements to be a little wider, because after the fact, I went in and put dividers in each slot for the reinkers to sit next to the color of ink pads. This thing is full. Afterwards, I made a box to sit on top with some sections to hold the remaining Vintage Photo and Black Soot that I use most of the time, so quick access, plus other things relating to distress inks, like the glaze, and so forth. Don't binge shop - wait until your orders come in, so you don't end up with duplicate reinkers because you don't have them at the time, lol.

Check out You Tube by typing in chipboard projects for the construction, and faux leather for the sides.
Hope you enjoyed this one ... now for the next one ... it's actually a Stickles carousel. I tried making the above for a Stickles carousel, but the shelves ended up being not high enough, so I modified it to the distress holder. This one, I measured twice and then cut once, lol.

The construction for this one was almost exactly like the above project, only smaller. There is room for 3 stickles on each shelf, all the way around. I left off the box on top of this one because this is my whole Stickles collection and figured I'd have more than enough. There is room to add something to the top at a later date if I find I'm running out of room.
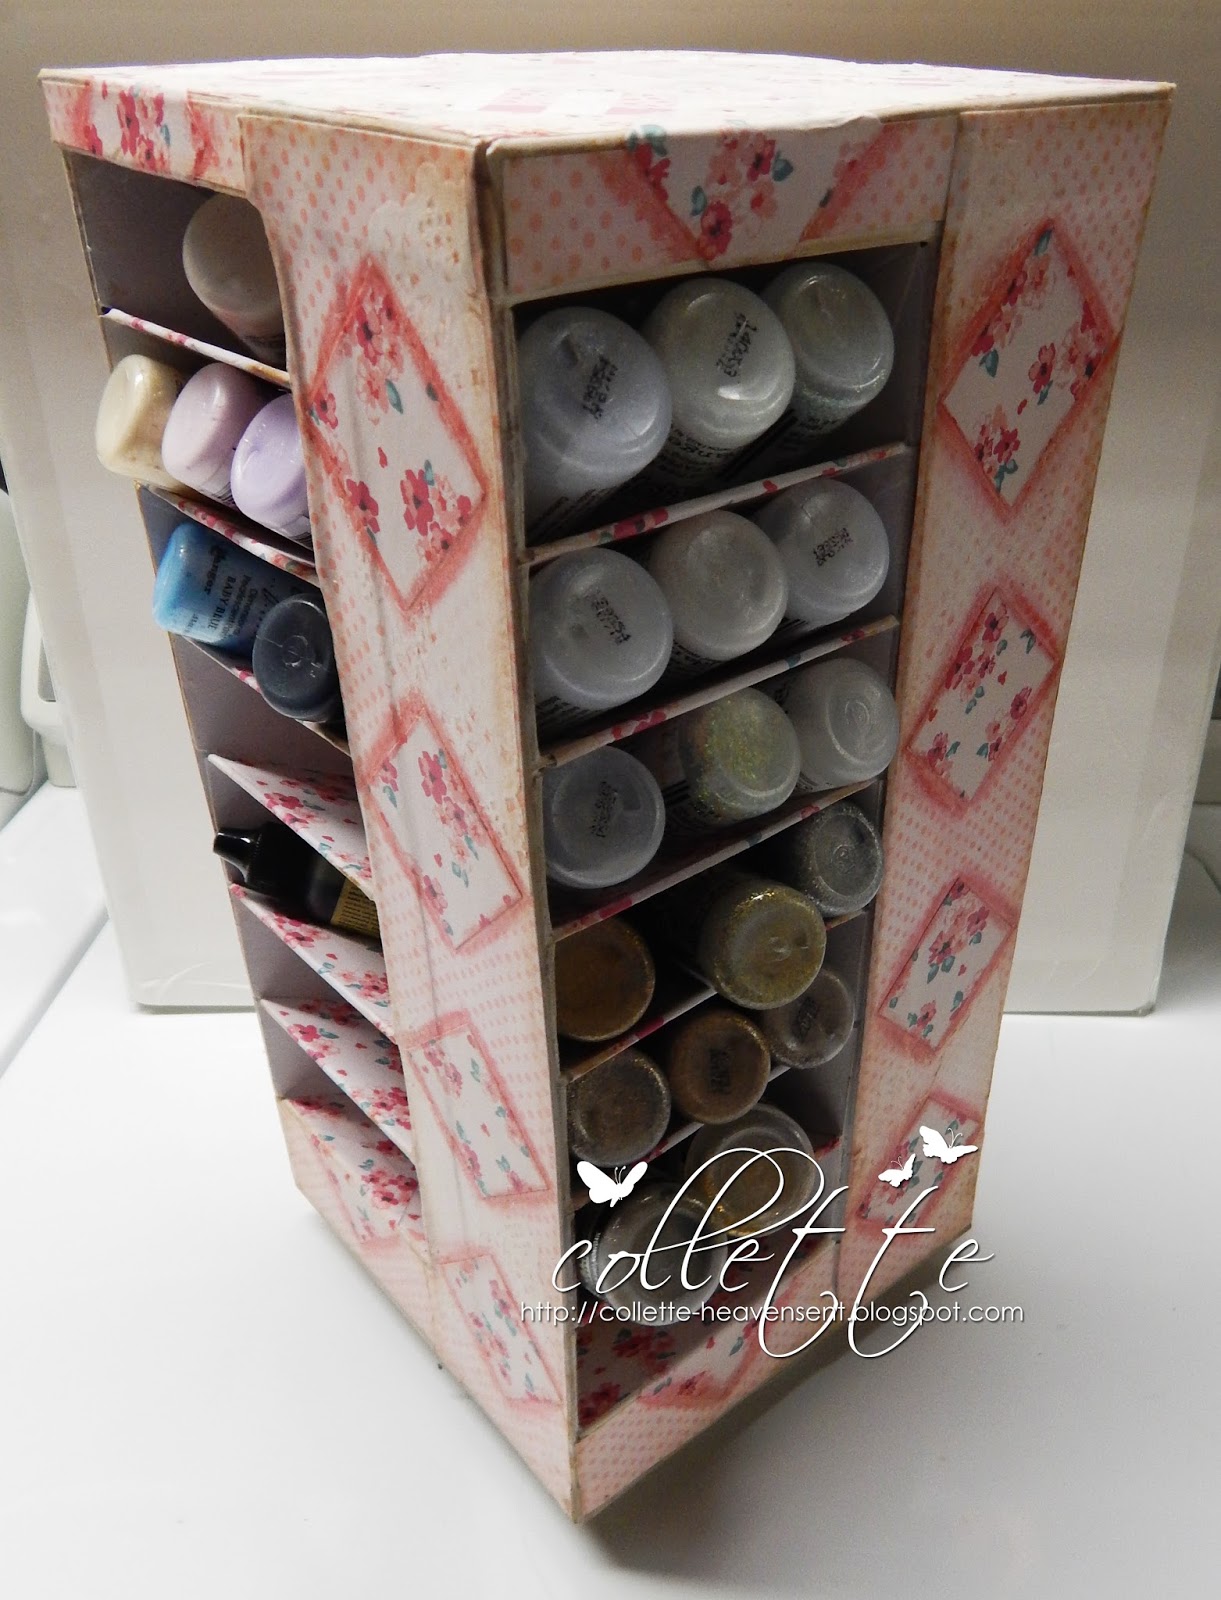
I decorated the shelves and sides with some pretty pink scrapbook paper and used one of my pink Pitt pens to add the shading around the diamonds on all 4 sides. Once I was done, I attached this one on a spinner/turntable/lazy susan measuraning 5 inches across. It spins perfectly and is a God send!
This next project I started making from 1/4 hobby wood. I made the shelving unit with a 3-part box on top with the wood. I then backed it with some heavy weight poster board.

Because I didn't measure as I was cutting and nailing this chest together, each of the boxes had to be started from scratch, as no two are the same size, but they're close. This box is going to be used for Tim Holtz findings like brads, hinges, corners, etc. The thing is full and I have tons more stuff, so another one is on it's way.

As you can see, I lined each of the drawers with pretty cardstock, then put the same pink floral on the front of each drawer, then got some pink candy stripe for the top, sides and back. I just love this look.
Since I'm already bursting, with more stuff on the desktop that needs a home, I started making another one .... Measure, you ask? Only so it would be square, lol. I'll have to back it with more heavy poster board and make the drawers individually. This has been on the backburner for about a month now.

I just wanted you to see what it starts out like - for me - again, this is all 1/4 inch hobby wood that I got at both Hobby Lobby and Ace Hardware. It's been like this for over a month, but I got distracted with the next project.

This is a beautiful suitcase inspired by Alexandra R on You Tube. She created a suitcase like this with a photo album attached, but for my purposes, I just wanted to try the suitcase empty. If you make one of these, be prepared - it takes lots of brads. I had to put it on hold for a bit because Michael's and Hobby Lobby were out or the brads in the bronze look, so had to wait for them from shopping online. I put a vintage stamp that I colored with inktense pencils on kraft paper and then used glossy Bindex (several layers) so it looks like it won't wear.

The leather straps are made from kraft cardstock folded and glued together lengthwise. After that, they were stained with Antique Linen and then I used some crackle paste, bending at the corners and curving the straps as I went along.

I used some digital burlap paper on the outside (burlap with doilies) and plain burlap on the inside. You can't see it from the pictures, but there are hinges on the bottom that were attached with those bronzed brads, as was the clasp. The bronze "D" rings attached the straps to the strips of "leather" on the sides.

Alexandra R put 2 clasps on the closure side, but it looked too crowded to me, so I just went with the one. It's not sturdy enough to use as a regular bag for very long I would think, but I'm making it for my bestie and filling it with cards I've made so she can have a sort of stationary case.

This is the inside with the plain burlap.
This really does look cool.
Yes, it was involved, but I stuck with it and finished the project. Thank you, Aleandra R for the inspiration. I know mine doesn't even come close, but I'm happy with it, and think the bestie will like it too.
Well, those were my Chipboard crafts that I've made so far.
I have to say, I wish that they sold some of those MDF shelving kits here in the US. It seems Australia has the corner market on laser cut chipboard kits. I don't know if I waiting and the trend is no longer there, but it's near impossible to find them. But I'm okay, because if I can't find one, I'll build it - either out of all chipboard, or with 1/4 inch wood strips and chipboard.
Thanks for stopping buy. Check out the next post ... it'll be an accumulation of the art journal pages I've been doing since the first of the year after my hiatus.


4 comments:
wow stunning projects Collette
gr karin
It is significantly more effective to build your own e-mail list for e-mail marketing than to purchase a list, or acquire the services of a marketing company that has their own lists. The reason for this is that everyone who Satta King Play Bazaar submits their e-mail address to be a part of your list is interested in the services or products that you have to offer. These people are far more likely to be receptive to your e-mail.
rahe khamosh dono aur baat kar li, mohabbat ki fizza ko jab khush paya, en aankho ne ro ro ke barsat ,play bazaar satta king
I truly love your site.. Great colors & theme.
Did you make this amazing site yourself? Please reply
back as I’m hoping to create my own personal website and would love
to know where you got this from or just what the theme is called.
Many thanks! 카지노사이트
Post a Comment